DIY High Speed Flash
This DIY project uses a high voltage system to create a very bright and short burst of light which is ideal for high speed photography. Standard flash guns will illuminate a subject for a relatively long time which will create a blur when photographing high speed events such as bullet impacts or exploding objects.
![]()
WARNING: This project involves large high voltage capacitors. It is very very dangerous! One small mistake could kill instantly. Only experienced high voltage engineers should attempt this project.
By using this homemade high speed flash, it is possible to generate a very short burst of light which is bright enough to allow you to capture high speed events with a typical SLR or DSLR camera.
AVAILABLE PARTS: Below you can find links to buy the key parts for this project
How It Works
The flash of light comes from the electrical breakdown of ordinary air at atmospheric pressure. When a large enough capacitor is discharged through an air gap, the intense current will briefly generate a burst of electromagnetic radiation covering a wide spectrum. The optical part of this spectrum is seen as a white flash of light just as in lightning discharges.
The circuit uses two high voltage inverters which will convert 12V DC into about 20kV. One inverter is used to charge up a large high voltage capacitor which will be used for discharging energy as a flash of light. The second inverter circuit is used to create a brief high voltage pulse that will trigger the discharge of the main flash on demand.
The Charging and Trigger Circuit
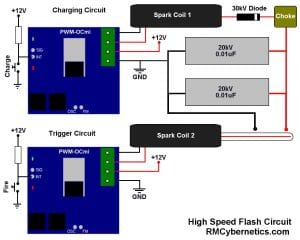 The primary inverter consists of a Power Pulse Width Modulator circuit which is used as an ignition coil driver to power a small High Voltage Spark Coil. The output of the ignition coil is fed through a HV Diode and a small inductor so that it can charge up a bank of large high voltage pulse capacitors. The capacitor terminals are connected to a pair of electrodes that are spaced a little larger than the spark could normally jump when the capacitor is fully charged.
The second inverter circuit is used to briefly ionize the air around the two main electrodes which will allow the capacitor to discharge. Another Power Pulse Width Modulator circuit is set up to drive an ignition coil whenever it is activated by a button or sensor. The output of the ignition coil is directly connected to a wire which is placed near the main electrodes.
When the flash fires, the capacitors may not be fully discharged. It is possible to fit something known as a bleeder resistor between the capacitor terminals. This resistor will slowly discharge the capacitor when not in use. The resistance will have to be very high; something like 100M ohms should be suitable for this.
The High Speed Flash Tube
 The high speed flash tube consists of two main electrodes on the outside of a small glass tube, plus a third electrode inside the glass tube so that it is isolated from the others.
The main electrodes are made by wrapping some wire around the outside of the tube. The wire used must be thick enough to withstand the high current and heat of the capacitor bank discharge. You could also use something else for the electrodes such as a pair of washers or nuts.
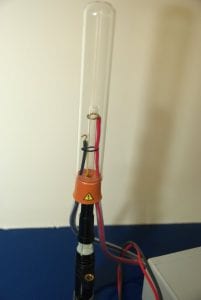
The cables from the electrodes need to be fixed so that they come away from the central tube and do not come close to each other, or anything else. They should be well insulated, especially once they are outside the tube. We used some silicon cable to feed directly from the capacitor to the electrodes and then added extra insulation by feeding the cable through some PVC tubing. This insulation was able to prevent any accidental discharge between the high voltage cables when in use, but should not be considered as safe for handling when live.
The third electrode is a piece of standard solid core wire which is stripped bare at the end. The length of bare wire should be about the length of the gap between the main electrodes. This wire is fitted inside the small glass tube so that the bare section is between the two main electrodes. The other end of the wire leads out of the tube and connects directly to the ignition coil. It can be quite useful to mount the high speed flash tube directly to the end of the HV coil so that it is not necessary to have another large insulated HV cable.
Using the Circuit
Before building the circuit, it is important to become familiar with the PWM Circuits being used for the ignition coil drivers. The setting of the duty control will determine the charge voltage and rate of charge. Setting this too high will overheat the the circuit or damage components.
The circuit should be powered from a 12V power source capable of delivering at least 3A. Check our notes on power supply considerations as there are tips that can help improve performance. This circuit is a high voltage circuit so the GND connection should be suitably earthed. If using a mains operated supply such as a lab bench PSU, this earth will most likely be built in.
The diagram above shows momentary push to make switches being used to charge and fire the circuit. To charge the flash, the ‘charge’ switch is held down for a few seconds. The exact time need will depend on number of capacitors used and the duty setting of the PWM. There is no built in method to determine if the capacitor bank is charged, so this will come down to user experience with the system. To fire the high speed flash the ‘fire’ switch just needs to be pressed briefly. It is possible to add a sensor instead of a push switch for activating the flash. The sensor just needs to be wired so that will pull low the INT connection of the trigger PWM when the flash needs to fire.
![]()
DANGER: The pressure waves from the discharging flash can cause the glass tubes to break. The tube should also be housed in a sturdy plastic case with reflector to direct the light and to capture any flying glass.
When using the system is is essential to have a clutter free work area, and to prepare for your photographs carefully. This will improve safety and also increase the chances of getting a good picture. The flash tube and capacitors should be fixed securely in position and mounted in such a way that someone could not accidentally touch or get too close to live parts.
To get the high speed photographs with an ordinary camera, the camera shutter needs to stay open so that an image is only exposed when the flash illuminates the subject. Most DSLR cameras will have a ‘bulb’ setting that allows you to keep the shutter open as long as is needed. It is of course essential that when performing DIY high speed photography like this, the room is totally dark (except during the flash) while the camera shutter is open.
The short bright flash from the tube when fired will be very bright and should never be viewed directly. It might also be helpful to wear sunglasses if the subject will be viewed when the flash is activated.
REMEMBER: This project involves high voltage, high current electrical discharges, potentially exploding glass shards, loud bangs, bright flashes, and must be operated in darkness! It is VERY dangerous! This project is here for educational purposes, we do not recommend that you attempt to replicate this project. You are entirely responsible for the way you use the information presented on this website.


I have not measured it at 9v, but your estimate sounds about right.
Thanks for that.
One more question, I have found that this will work on 9 volts very well, could you please tell me what charging voltage I should get from this at this rate, I am assuming between 14 and 18kv, would that be about right. Thanks.
There is no push button on the PWM circuit used. If you mean the one you attatch to the circuit then the resistor used should be 10k ohms.
Ok, let me try to explain it clearer.
On the PMW circuit there is a push button and a 10ohm resistor, which if I am reading it correctly, is for charging the Caps. This is not functioning, the caps are being charged continuously.Is there a problem, or am I simply misreading the info supplied. Cheers Ernie
Sorry, I don’t understant what you mean.
Hi, I have cured the arcing etc, but have a another problem, it seems the switching to charge the caps is not functioning as required, it seems as though it is being bypassed, because it is still charging the Cap, any idea what the problem may be. Cheers Ernie
You could immerse the choke in oil to prevent arcing. Choke value is not critical and it will work without it. Just a few turns can be enough.
I am having a couple of problems though the capacitor is getting some charge, from my experience in building two other high speed flashes using different circuits, it spark when shorting the capacitor should be much bigger. but I am not game to increase the duty cycle because it is arcing across the choke, and it is continuously charging the cap with out using the switch. Any ideas on this.
Also what is the minmum values for the choke. Ernie
We no-longer stock the choke originally used, but I have updated the link with an alternative. The choke can easily be made yourself by winding 10 or more turns of insulated wire around a bolt.
I have the components I need already in the wish list, but I am missing one component, the 16uh choke, your link to it fails, does this have any special specs, because as far as I can see from my research there are differnt models out there. Thanks Ernie
If either James or Jim have built and used this flash I would be interested in a link to the resulting shots
And any info on problems and solutions that you found along the way.
One of my pics using std speedlite

Yes, 25% duty should be OK. The frequency at which the coil is driven will have some effect on effeciency. There are some frequencies which work better than others, allthough at low frequencies (<1kHz) there is not so much variation. Typically the lowest frequency setting with the a 10nF timing capacitor for the OCmi will be fine.
Thank you. In order to avoid overheating I will turn the duty cycle down. Does 25% of the maximum seem like a sensible place to start?
Should I also turn the frequency down very low as well?
Thanks,
Jim
The output from the circuits is pulsed DC so you should measure it using a DC volt meter. The reading will be a sort of average of the output voltage. 12V input is enough for this project. Any higher ant you risk outputting too much voltage from the coil.
The capacitor being connected to the output of the ignition coil prevents the voltage rising as high as it normally would in most cases. Also to get over 20kV from the coil you will have to turn up the duty quite high which would also cause excess heatng in the PWM-OCmi.
In order to know for sure the voltage level of your capacitor you would need a HV voltage divider or dedicated HV meter. You can approximate the voltage by how far the spark will jump (untriggered). It will be around 10kV per cm.
I received the parts for the high speed flash, thank you and have wired up the coil driver PCB which will charge the capacitors. Roughly what the output should be and what is the best way to measure it?
It’s taking 12v DC from a PSU (11.6 on the mutimeter) and activates correctly by pulling the interrupt pin low.
Set to AC, the mulimeter reads the PCB as outputting 22.8V, with the duty cycle set to maximum. When set to DC, the voltmeter gives an output voltage of around 11V, again with the duty cycle set to maximum. In either case, the voltage can be reduced to zero or anywhere in between by turning the duty cycle pot. As you’d expect, changing the frequency pot makes no difference to the output voltage.
I had thought that the ignition coil needed a much higher input voltage than this? Can you tell me what I ought to be expecting from the PCB? Is a multimeter the right thing to be using, given that it’s AC setting is (presumably) designed for the sort of full-wave, sine AC you get from a wall socket? I’m not sure what the waveform output of the PCB is and the effect this would have on a multimeter.
Secondly, I had a look at the datasheet for the ignition coil and it refers to a maximum output of 24kV. How can I ensure that it doesn’t, in practice, exceed 20kV (or perhaps more like 18kV to allow the capacitor a bit of headroom)?